Manage and Delete Contacts on Your iPhone
Deleting All Contacts at Once
It allows you to delete a lot of iPhone contacts simultaneously in just a few taps instead of manually deleting each one individually. So,
- Open the Contacts app from your phone and tap “Select” in the top right corner.
- next, tap each contact circle you want to delete.
- A checkmark will appear, which will select multiple contacts.
- After selecting your desired contacts to delete, tap the red “Delete” button at the bottom.
- A pop-up prompt will appear to confirm the contacts you want to delete.
- All your selected contacts will now be deleted from your iPhone at once with this batch deletion method.
Tapping on any contact displays all the details saved for that person – useful for determining if the contact is still relevant before deleting.
View All Contacts
:max_bytes(150000):strip_icc()/add-favorites-iphone-828a3ec1d60049b5a95182f1ce119c95.jpg)
The Contacts app organizes all your saved contacts alphabetically by default. Simply opening the Contacts app and scrolling through is the easiest way to view every contact saved on your iPhone. Check through the list regularly to make sure outdated contacts are removed.
Here are the steps to view all your contacts on an iPhone:
- Open the Pre-installed Contacts app.
- Your contacts list will appear. This list automatically displays all contacts stored on your iPhone.
- To view more contacts, scroll down the list by swiping up to see names beyond the initial contacts shown. Continue scrolling to browse your full contacts list from A to Z.
- If you have a very long list of contacts, you can also tap one of the letters along the right side to quickly jump to names starting with that letter.
- Tapping on any contact name opens more details about that person. Scroll down on an individual contact’s card to see all phone numbers, email addresses, and other info saved for them.
- To return to your full contacts list from an individual entry, tap the small arrow in the upper left corner.
Delete Specific Contacts
Contacts app search bar to quickly find any specific contact saved on your iPhone. This allows you to directly access names without having to scroll through or know alphabetical order. The search feature makes locating contacts fast and easy. Here are the steps
- Open the Contacts app.
- Tap the search bar at the top, which says “Search” inside it.
- Type the contact name you want to search for.
- As you type, results matching your search term will start populating automatically below the search bar.
- Open the full details of a selected contact by tapping contact from the search results.
- Again check the contact name spelling If your contacts aren’t found through a search, they may not be saved in your contacts list.
- You can also search by details other than names, like phone numbers or email addresses. Just input a phone number or email instead of a name.
Delete Individual Contacts
![How to Delete Contacts on iPhone [Quick Ways]](https://imobie-resource.com/en/support/img/delete-all-contacts-on-iphone-1.png)
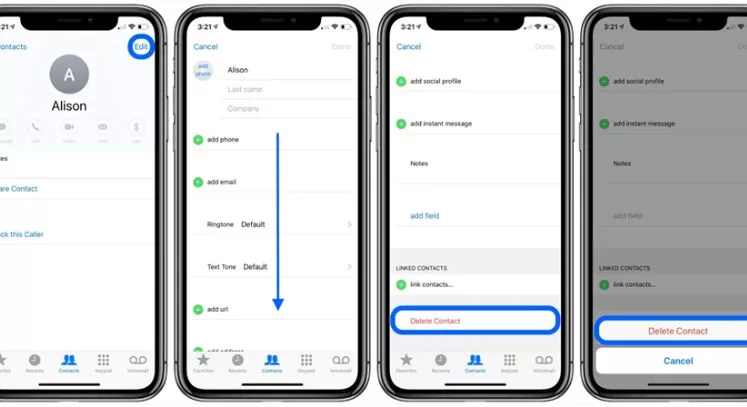
Here is the method to delete unwanted contacts individually.
- Tap the contact.
- Then scroll down and tap “Edit” in the upper right corner.
- On the editing screen, you’ll see a red minus button.
- Tap the red minus button at the bottom titled “Delete Contact”.
- This brings up a confirmation screen; tap “Delete Contact” again on this pop-up window to confirm.
That contact is now erased from your iPhone permanently. Once you have identified a singular contact to remove, open it, tap Edit, then Delete Contact, and confirm on the prompt to erase it from your device. his allows you to selectively delete outdated or unwanted contacts one by one.
Select Multiple Contacts
If you want to mass delete a bunch of contacts simultaneously, your iPhone has a handy select feature that lets you choose multiple contacts at once. From your main Contacts list, tap “Select” in the upper right corner. This brings up a checkmark icon, Tap the checkmarks you wish to delete so a checkmark displays for each. Once you’ve selected all unwanted contacts, tap the red “Delete” button at the bottom of the screen. Confirm again on the pop-up and all selected contacts will be deleted.
Export and Backup Contacts
Before embarking on a mass contact deletion, it’s wise to back up or export your contacts so you have a saved copy. You may realize later there were useful contacts you inadvertently deleted. Tap the ellipses (…) icon from the main Contacts menu, then choose “Select All”. Once all are selected, tap the Share icon in the menu bar and then tap “vCard” to export contacts to an external .vcf file as a backup. Alternatively, contacts are included in iTunes and iCloud backups of your device.
Conclusion
The Contacts app stores and organizes all your phone contacts alphabetically. You can view, search, edit, or delete contacts right within this app. These steps make it easy to keep your iPhone contacts organized, manage old contacts, and permanently erase contacts you no longer need clogging up your list. Perform regular maintenance by reviewing and deleting unnecessary contacts. With just a few taps, you can optimize who appears in one of your most frequently used iPhone apps. Periodically removing contacts you no longer communicate with or need to store creates a more efficient experience accessing and interacting with your connections. Managing contacts is easy with the native Contacts app features on iOS.